Picture this: You’re at the gym, attempting your third set of squats, and something just feels off. Your knees ache a bit, your lower back feels tense, and you’re not entirely sure whether you’re doing this right or accidentally signing up for an injury. Sound familiar?
Related reading: Can You Actually Learn a New Language in 3 Months Using Apps?.
Getting your squat form right isn’t about perfection. It’s about understanding a few key mechanics that transform an uncomfortable, potentially risky movement into something that actually builds strength safely. The reality is, most people waste months doing squats that don’t serve them well, simply because no one explained the basics properly.
You’re not alone in this. Thousands of gym-goers across the UK perform squats daily with questionable technique, either because they learned from watching others (who also learned incorrectly) or because they’re following advice that doesn’t suit their body type. The frustrating part? Once you understand the fundamentals, improving your squat form becomes surprisingly straightforward.
Common Myths About Squat Form
Related reading: Hip Mobility Drills That Actually Deepen Your Squat.
Myth: Your knees should never go past your toes
Reality: This outdated advice causes more problems than it solves. For most people, especially those with longer femurs, the knees will naturally travel slightly past the toes during a proper squat. What actually matters is that your knees track in line with your toes and don’t collapse inward. According to research from the University of Birmingham, preventing natural knee travel forward often leads to excessive forward lean, placing unnecessary stress on the lower back instead.
Myth: Everyone should squat to the same depth
Reality: Your ideal squat depth depends on your mobility, body proportions, and training goals. Whilst going “arse to grass” works brilliantly for some people, others may only safely reach parallel initially. Focus on maintaining proper form through whatever range of motion you can control, then gradually work on increasing depth as your mobility improves.
Myth: Squat form is the same for everyone
Reality: Someone with long legs and a short torso will have a different-looking squat than someone with shorter legs and a longer torso. Both can be correct. Your anatomy dictates your optimal stance width, toe angle, and torso position. Trying to copy someone else’s squat form exactly might force your body into positions it wasn’t designed for.
The Foundation: Setting Up Your Squat Properly
You might also enjoy: Compound Movements: The Complete Guide to Multi-Joint Exercise Mastery
Before you worry about depth or tempo, you need to establish a solid starting position. This foundation makes everything else easier.
Finding Your Stance Width
Your squat stance should feel stable and allow your hips to move freely. For most people, positioning your feet somewhere between hip-width and slightly wider than shoulder-width works well. Your toes should point outward at roughly 15-30 degrees, not straight ahead.
Here’s a simple test: Stand normally, then jump up slightly. Where your feet land naturally is often close to your ideal squat stance. From there, adjust based on what feels powerful and controlled.
Creating Tension Before You Descend
Many squat form issues start before the movement even begins. Creating full-body tension protects your spine and makes the lift more efficient.
Take a deep breath into your belly, not your chest. Hold that breath and brace your core as if someone might punch you in the stomach. Your torso should feel solid, like a pressurised can. This technique, called the Valsalva manoeuvre, is recommended by strength coaches worldwide for maintaining spinal stability during heavy lifts.
The Descent: Breaking at Hips and Knees Simultaneously
One of the biggest squat form mistakes happens right at the start of the movement. Some people break at the hips first (creating what’s essentially a good morning), whilst others break at the knees first (pushing them too far forward).
Instead, imagine sitting back into a chair that’s slightly behind you whilst simultaneously allowing your knees to bend. Both joints should start moving at roughly the same time. Your weight should stay distributed across your entire foot, particularly through the mid-foot and heel.
The Critical Middle: What Happens During the Descent
The downward portion of a squat reveals most form issues. This is where your body wants to compensate for mobility limitations or weakness.
Keeping Your Chest Up Without Overarching
You’ve probably heard “chest up” shouted across every gym floor. Whilst keeping your torso relatively upright helps, overcorrecting creates a different problem. Overarching your lower back to force your chest higher places excessive stress on your lumbar spine.
Focus instead on maintaining a neutral spine. Your torso will naturally lean forward somewhat during a squat, especially if you have longer legs. That’s perfectly fine. What matters is that your spine maintains its natural curves without excessive rounding or arching.
Controlling Knee Position
Watch your knees during the descent. They should travel in the same direction as your toes, creating a straight line from hip to knee to second toe. If your knees cave inward (valgus collapse), you’re losing power and increasing injury risk.
This knee caving often indicates weak hip abductors and external rotators. Actively think about pushing your knees outward during the squat, as if you’re trying to spread the floor apart with your feet. Something like resistance bands around your thighs during warm-up squats helps teach your body this movement pattern.
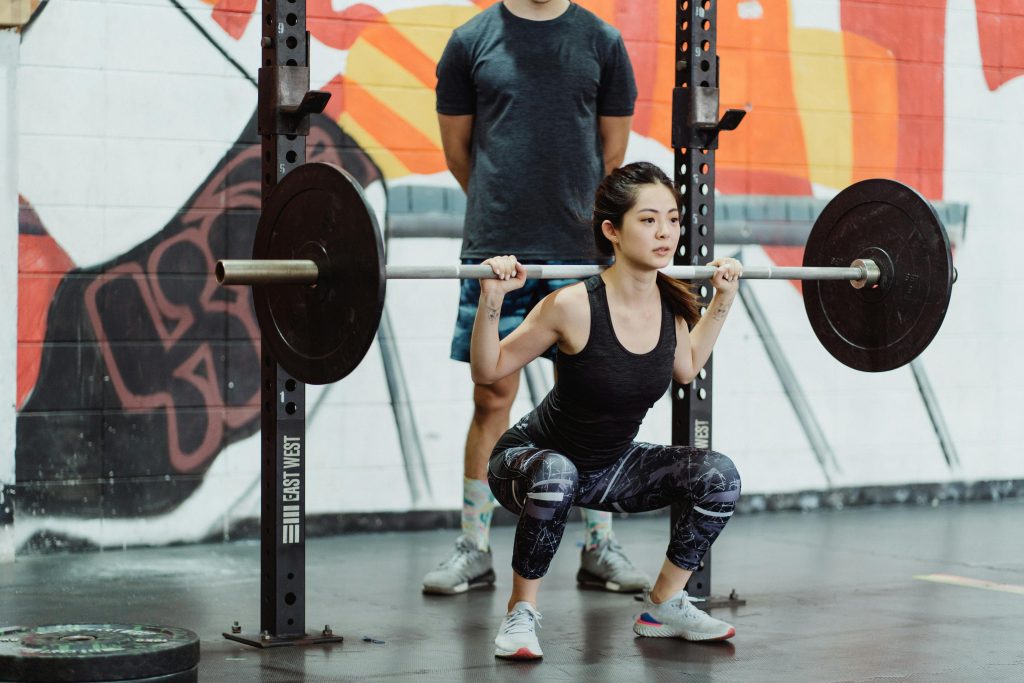
Reaching Appropriate Depth
For general fitness and strength development, squatting until your hip crease drops just below your knee (slightly below parallel) provides excellent benefits. This depth allows full glute and hamstring engagement whilst remaining accessible for most people.
If you can’t reach this depth whilst maintaining good squat form, don’t force it. Work at the depth you can control, then address the mobility limitations holding you back. Tight ankles, restricted hips, and limited thoracic mobility commonly prevent proper squat depth.
The Turnaround: Transitioning from Descent to Ascent
The bottom position of a squat, often called “the hole,” requires particular attention. Many people relax here or bounce aggressively, both of which compromise form and safety.
Maintain that core tension from your setup. Don’t let your spine round or your chest collapse. Pause briefly if needed, then drive upward with control. Imagine pushing the floor away from you rather than pushing yourself up. This mental cue often helps maintain better squat form throughout the ascent.
The Drive Up: Maintaining Position Under Fatigue
As you stand up, everything that mattered during the descent still matters. Your knees should continue tracking outward, your core should stay braced, and your spine should maintain its neutral position.
Common issue: the hips shooting up faster than the shoulders, creating what’s called a “stripper squat” (because it resembles someone standing up whilst removing trousers). This typically indicates either weak quads or a weight that’s too heavy. If this happens, reduce the load and focus on driving your shoulders and hips upward at the same rate.
Mobility Work That Actually Improves Squat Form
You can’t technique your way around mobility restrictions. If your ankles, hips, or thoracic spine lack necessary range of motion, your squat form will suffer no matter how much you concentrate.
Ankle Mobility Essentials
Limited ankle dorsiflexion forces your body into compensations. Either your knees stop travelling forward (causing excessive hip hinge), or your heels lift off the ground (compromising stability).
Test your ankle mobility: Kneel with one foot forward, toes about 10cm from a wall. Can you push your knee forward to touch the wall whilst keeping your heel down? If not, your ankles need work.
The NHS physiotherapy guidelines recommend regular ankle mobilisation exercises. A simple drill: Face a wall, place your hands against it, and rock forward and back, focusing on keeping your heel planted whilst your knee travels toward your toes. Spend two minutes daily on each ankle.
Hip Mobility for Deeper Squats
Tight hip flexors and restricted hip capsules prevent you from reaching proper depth whilst maintaining an upright torso. The 90/90 position works brilliantly for opening up your hips.
Sit on the floor with one leg bent in front of you at 90 degrees and the other bent behind you at 90 degrees. Sit tall, working toward getting both glutes on the ground. Hold for 30-60 seconds, then switch sides. Perform this daily, preferably before squatting.
Thoracic Spine Extension
A stiff upper back forces you to compensate elsewhere, usually by overextending your lower back or rounding forward excessively. Thoracic extension exercises improve your ability to maintain an upright position during squats.
A foam roller works well for this. Place it horizontally across your upper back, support your head with your hands, and gently extend backward over the roller. Move the roller to different positions along your upper back, spending 20-30 seconds in each spot. The satisfying crunch often indicates you’ve found a particularly tight area.
Your 14-Day Squat Form Reset
Improving your squat form requires consistent practice with appropriate progressions. Here’s a practical two-week plan that builds proper movement patterns.
- Days 1-3: Focus exclusively on bodyweight squats. Film yourself from the side and front. Watch for common issues: knees caving, heels lifting, excessive forward lean. Perform 3 sets of 10 reps daily, thinking about each position.
- Days 4-5: Add goblet squats holding a single dumbbell or kettlebell at chest height. Start with something light, perhaps 4-8kg. The weight counterbalances you slightly, making it easier to sit back and maintain an upright torso. Complete 4 sets of 8 reps.
- Days 6-7: Introduce tempo work. Lower yourself over 3-4 seconds, pause for 1-2 seconds at the bottom, then drive up. This controlled pace reveals form breakdowns that speed might hide. Stick with bodyweight or very light goblet squats. Try 3 sets of 6 reps.
- Days 8-10: Begin box squats to teach proper depth and hip engagement. Set a box or bench at just below parallel height. Squat back until you touch the box (don’t fully sit), then drive back up. This teaches you to sit back properly. Perform 4 sets of 8 reps.
- Days 11-14: Return to regular squats, focusing on applying everything you’ve practised. Gradually add weight if using external load, but only if your form remains solid. Quality matters infinitely more than quantity at this stage. Complete 4 sets of 8-10 reps daily.
Throughout these two weeks, perform your ankle, hip, and thoracic mobility work before each squat session. Those five minutes of preparation make a noticeable difference in how your squats feel.
Common Squat Form Mistakes and How to Fix Them
Mistake 1: Letting Your Knees Cave Inward
Why it’s a problem: Knee valgus places excessive stress on your knee ligaments, particularly the ACL, and reduces the power you can generate from your hips. Over time, this pattern increases injury risk significantly.
What to do instead: Before each set, practice mini-band walks. Place a resistance band just above your knees and take 10 steps forward and 10 steps back, maintaining tension on the band. This activates your hip abductors. During squats, actively think “knees out” throughout the entire movement.
Mistake 2: Rising Onto Your Toes
Why it’s a problem: Shifting onto your toes moves the weight forward, placing excessive stress on your knees and reducing glute and hamstring activation. You’re essentially turning a squat into a calf raise with poor leverage.
What to do instead: Practice squats with your toes slightly elevated on small plates or a thin book. This forces weight back into your heels. Feel the pressure through your mid-foot and heel throughout each repetition. Address ankle mobility limitations with the drills mentioned earlier.
Mistake 3: Bouncing Out of the Bottom Position
Why it’s a problem: Bouncing creates momentum that your joints and connective tissues must absorb. This ballistic loading increases injury risk whilst reducing the actual strength stimulus to your muscles.
What to do instead: Practise paused squats regularly. Descend with control, hold the bottom position for a clear 2-second count, then drive upward smoothly. This builds strength in the most challenging position whilst teaching you to maintain tension without momentum.
Mistake 4: Rushing Your Descent
Why it’s a problem: Dropping quickly into a squat means you’re not controlling the movement. Your stabiliser muscles can’t engage properly, form breaks down, and you’re relying on passive structures (ligaments, joint capsules) rather than active muscular control.
What to do instead: Take at least 2-3 seconds to lower yourself. Think of the descent as the most important part of each repetition. This controlled tempo builds more muscle, improves your body awareness, and ingrains better movement patterns.
Equipment Considerations for Better Squat Form
Whilst perfect squat form is achievable with just your bodyweight, certain tools can help address specific limitations or make the learning process easier.
Squat Shoes: When They Help
Weightlifting shoes feature an elevated heel (typically 12-20mm) and a rigid, non-compressible sole. That heel elevation effectively gives you better ankle mobility, making it easier to achieve depth whilst maintaining an upright torso position.
Look for shoes with a firm base and secure fit if you decide you need them. However, they’re not essential. Many people squat brilliantly in flat-soled trainers or even barefoot (where permitted). Focus first on improving your actual ankle mobility rather than immediately compensating with footwear.
Belts for Core Support
A lifting belt doesn’t hold you up or prevent injury through magical properties. Instead, it gives your abdominal muscles something to push against, allowing you to create more intra-abdominal pressure. This can be helpful once you’re squatting genuinely heavy loads (relative to your strength level).
For beginners working on squat form, belts aren’t necessary and might actually prevent you from learning to brace properly without assistance. Build that core stability first through consistent practice with lighter loads.
Programming Squats for Continuous Improvement
How you structure your squat training affects both your form development and strength progression. Random sessions without progression won’t deliver results.
Frequency and Volume
Squatting 2-3 times weekly allows sufficient practice to improve your squat form whilst providing adequate recovery. Beginners often benefit from higher frequency (3 times weekly) with moderate volume per session, as this provides more opportunities to practice the movement pattern.
A reasonable starting point: 3 sets of 8-10 reps per session. As your form solidifies and strength increases, you might progress to 4-5 sets of 5-8 reps with heavier loads. The NHS Active guidelines recommend strength training at least twice weekly for general health, and squats serve as an excellent compound movement to meet this recommendation.
Progressive Overload Done Sensibly
Once your squat form is solid, you can begin adding weight progressively. Small, consistent increases work better than large jumps. Adding 2.5-5kg weekly to your main working sets is ambitious but achievable for beginners. More advanced lifters might only add weight fortnightly or monthly.
Remember that progression doesn’t always mean more weight. Improving your depth, increasing your controlled tempo, or adding extra reps at the same weight all represent genuine progress. Don’t sacrifice squat form to chase numbers on the bar.
Recognising When Something’s Actually Wrong
Some discomfort during squat training is normal, particularly muscular fatigue. However, certain sensations indicate a genuine problem that requires attention.
Normal Sensations
- Muscular burning in your quads, glutes, and hamstrings during and after sets
- General muscle soreness 24-48 hours after training, especially when you’re new to squats
- Mild to moderate fatigue in your lower back muscles (they work as stabilisers)
- Feeling challenged and slightly breathless during sets
Warning Signs
- Sharp, acute pain in your knees, hips, or lower back during or immediately after squats
- Pain that worsens with continued training rather than improving with warm-up
- Clicking or catching sensations in your joints accompanied by pain
- Numbness, tingling, or radiating pain down your legs
- Severe lower back pain that affects your daily activities
If you experience warning signs, stop squatting and consult a physiotherapist or sports medicine professional. Many issues caught early resolve quickly, whilst ignored problems can become chronic. The NHS provides free physiotherapy services through GP referral for such concerns.
Your Squat Form Essentials Checklist
Save this quick reference for use before each squat session:
- Set your stance at hip to shoulder-width with toes angled out 15-30 degrees
- Create full-body tension by breathing into your belly and bracing your core
- Initiate the descent by breaking at hips and knees simultaneously
- Maintain active pressure through your mid-foot and heels throughout
- Keep your knees tracking in line with your toes, actively pushing them outward
- Descend until your hip crease drops just below your knee whilst maintaining form
- Drive upward with controlled power, keeping your chest position consistent
- Complete your mobility work before each session for optimal movement quality
Your Squat Form Questions Answered
How long does it take to learn proper squat form?
Most people develop competent squat form within 2-4 weeks of consistent, focused practice. However, refining your technique is an ongoing process that continues for months or years as you identify and address subtle issues. Beginners should expect to spend at least two weeks practising bodyweight squats and light goblet squats before adding significant external load. Remember that learning proper movement patterns takes time, and rushing this process often leads to ingrained bad habits that become harder to correct later.
Should I squat if I have knee pain?
Knee pain during squats often indicates a form issue, inappropriate loading, or an underlying condition that needs assessment. Squats performed with proper form actually strengthen the structures around your knees and can be rehabilitative. However, squatting through sharp or worsening pain is never advisable. Consult a physiotherapist who can assess your specific situation, identify whether your squat form is contributing to the problem, and provide appropriate modifications or treatment. Many people with knee concerns can squat safely once they address technique issues and start with appropriate progressions.
Is it better to squat with free weights or a Smith machine?
Free weight squats (barbell back squats, goblet squats, dumbbell squats) require more stabilisation and allow your body to move in its natural movement pattern. Smith machines lock you into a fixed vertical path that doesn’t match how most people naturally squat. Whilst Smith machines might feel more stable initially, they often force your body into positions that don’t suit your anatomy. For developing functional strength and proper squat form, free weights provide superior benefits. Start with bodyweight or goblet squats, then progress to barbell squats when your form is solid.
Do I need to warm up specifically for squats?
Absolutely. Squatting with cold muscles and joints increases injury risk and makes proper form harder to achieve. Spend 5-10 minutes on general movement like walking or cycling, then perform specific squat preparation including your ankle, hip, and thoracic mobility drills. Follow this with several sets of bodyweight squats, gradually adding weight in small increments until you reach your working load. This progressive warm-up prepares your nervous system for the movement pattern whilst ensuring your tissues are ready for the demands you’ll place on them.
How do I know if I’m going deep enough?
For general strength and fitness purposes, squatting until your hip crease drops just below your knee joint (slightly below parallel) provides excellent benefits. Film yourself from the side to check your depth accurately. The bottom position should feel controlled rather than unstable. If you can’t reach this depth whilst maintaining a neutral spine and keeping your heels down, work at whatever depth you can control, then gradually improve your mobility. Forcing depth you don’t have the mobility for compromises your squat form and increases injury risk.
Building Strength Safely Through Better Movement
Your squat form matters more than the weight on the bar, at least initially. Developing solid movement patterns now prevents injuries later and builds a foundation for genuine long-term strength development.
Everything covered here works, but only if you apply it consistently. Film your squats regularly. Notice when your form breaks down and at what point in the set. Address mobility limitations systematically. Progress the weight only when your technique stays solid.
Start with bodyweight squats this week. Just those, performed with focus and attention to each position. Master the basics before adding complexity. That’s how you build movement quality that serves you for years, not just weeks.


