You’ve seen the rowing machine tucked in the corner of your gym, looking deceptively simple. But here’s a surprising fact: nearly 80% of people who use rowing machines for cardio and strength training are doing it incorrectly. Poor rowing machine form doesn’t just limit your results – it can actually lead to back pain, knee strain, and wasted effort. The good news? Once you understand proper rowing machine form, this single piece of equipment delivers a full-body workout that rivals any combination of cardio and strength exercises.
📖 Reading time: 25 minutes
Picture this: You’re at your local gym, determined to mix up your usual treadmill routine. You climb onto the rowing machine, grab the handle, and start pulling. Your back aches within five minutes. Your legs feel disconnected from the movement. You’re sweating but not in that satisfying way that signals a proper workout. Sound familiar? Thousands of gym-goers across the UK face this exact frustration because they’ve never been taught the fundamentals of proper rowing technique. The rowing machine – or ‘erg’ as rowing enthusiasts call it – is capable of burning up to 600 calories per hour while building strength in your legs, core, back, and arms simultaneously. But only if you’re using it correctly.
Common Myths About Rowing Machine Form
For more on this topic, you might enjoy: How to Use Gym Machines Properly for Beginners Without Fear or Injury.
Before we dive into the proper technique, let’s clear up some widespread misconceptions that might be sabotaging your workouts.
Myth: Rowing is all about arm strength
Reality: Your legs should be doing approximately 60% of the work in proper rowing machine form. Your core contributes about 20%, and your arms only 20%. When you watch Olympic rowers, you’ll notice their powerful leg drive initiates every stroke. Many beginners make the mistake of yanking with their arms while keeping their legs relatively passive, which not only reduces the workout’s effectiveness but also puts unnecessary strain on the lower back. The rowing stroke should flow from your legs, through your core, and finish with your arms – in that precise order.
Myth: Faster is always better for cardio
Reality: Stroke rate matters less than stroke quality. Elite rowers typically maintain between 24-30 strokes per minute during steady-state training, whilst beginners often frantically churn out 40+ strokes with terrible form. When you focus on powerful, controlled strokes with proper rowing machine form, you’ll generate more watts (the measure of power output on rowing machines) and burn more calories than rushing through sloppy repetitions. Quality always trumps speed.
Myth: The harder you grip the handle, the better
Reality: A death grip on the rowing handle creates tension up through your forearms, biceps, and shoulders, actually limiting your power and causing premature fatigue. Proper rowing machine form involves a relaxed, hook-like grip where your fingers do the work rather than your whole hand. Think of hanging from the handle rather than strangling it. This allows for a smoother stroke and better power transfer from your larger muscle groups.
Understanding the Four Phases of Proper Rowing Machine Form
Related: How to Squat with Proper Form for Beginners: Master the Foundation Move.
The rowing stroke isn’t one continuous movement – it’s a sequence of four distinct phases. Master these, and you’ll transform your rowing from awkward fumbling to fluid power.
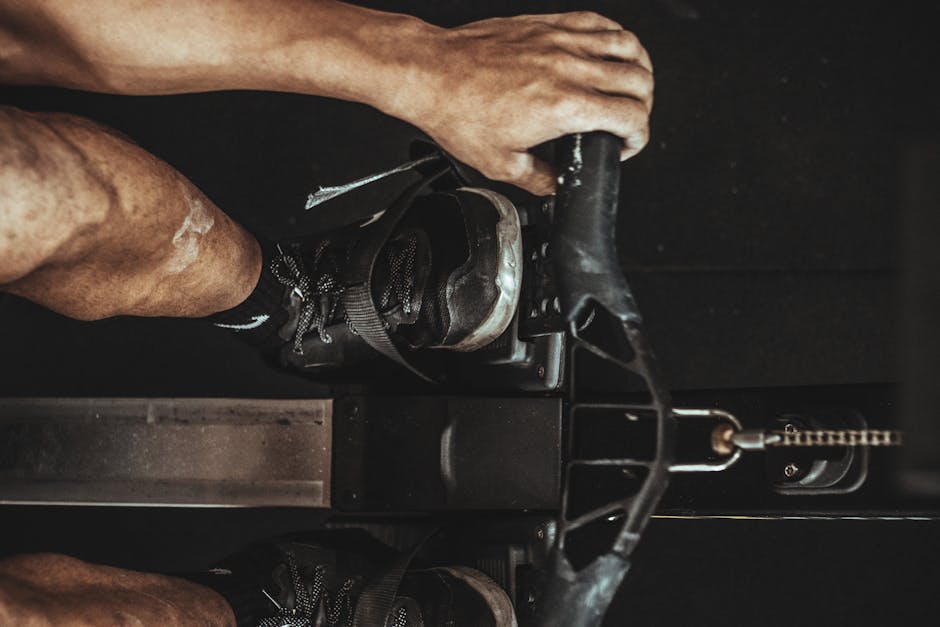
The Catch: Your Starting Position
This is where each stroke begins. Your shins should be vertical or nearly vertical, knees bent, with your body leaning slightly forward from the hips. Your arms are straight, shoulders relaxed and slightly in front of your hips. The handle should be at or just below knee height. Many people make the mistake of starting with their hips too low or back too rounded – both of which compromise the powerful leg drive that’s essential for proper rowing machine form.
Check your position: Can you hold the catch position comfortably for 10 seconds? If your legs are burning or shaking, your knees are probably too far over your ankles. You want your weight balanced over the balls of your feet on the footplates, heels potentially lifting slightly. According to research from the University of Birmingham’s School of Sport, establishing a solid catch position is the single most important factor in preventing lower back injuries during rowing.
The Drive: Generating Power
This is where the magic happens. The drive phase is where you generate the power that makes rowing such an effective workout for both cardio and strength. Here’s the crucial sequence that defines proper rowing machine form: legs first, then core, then arms.
Push hard through your feet, driving your legs down whilst keeping your arms straight and core engaged. Only when your legs are nearly extended should your torso start to swing back through the vertical position to about 11 o’clock (leaning back slightly). Finally – and only finally – pull the handle into your lower ribs, just below your chest. Your elbows should draw back past your torso, not flare out to the sides.
Think of it as a wave of power flowing from your feet through your entire body. The complete drive phase should take about one second, though this varies with your stroke rate. What matters most is the sequence: if your arms bend before your legs finish extending, you’re leaving significant power on the table and probably straining your back.
The Finish: The Power Position
At the finish, your legs are extended but not locked, your torso is leaning back slightly (about 11 o’clock, or a 110-degree angle between your legs and torso), and the handle is pulled into your lower ribs. Your shoulders are low and relaxed, not hunched up by your ears. This position should feel powerful and stable, not strained.
Here’s a key checkpoint for proper rowing machine form: at the finish position, the handle should travel horizontally. If you’re pulling the handle toward your face or your stomach, your body position needs adjustment. The NHS physiotherapy guidance on rowing technique emphasises maintaining a neutral spine throughout the entire stroke, which this finish position should reflect.
The Recovery: Returning with Control
The recovery is the opposite of the drive, but it’s not simply rowing backwards. This phase should take roughly twice as long as the drive – it’s your chance to breathe, compose yourself, and prepare for the next powerful stroke. Proper rowing machine form during recovery prevents you from rushing and maintains the rhythm that makes rowing meditative rather than frantic.
The sequence reverses: arms extend first, pushing the handle away from your body. Once your arms are straight, your torso pivots forward from the hips back to that slight forward lean. Only then do your knees bend, allowing your seat to slide forward as you return to the catch position. Arms, body, legs – in that order.
Common mistake alert: Many beginners let their knees bend too early, which causes the handle to crash into their knees on the way forward. If this is happening to you, consciously think “arms away, body over, legs bend” and pause slightly between each phase until the sequence becomes automatic.
Setting Up Your Rowing Machine for Success
You may also find this helpful: Sauna and Steam Room Benefits That Transform Your Recovery Health.
Before you even start rowing, proper setup determines whether you’ll maintain good form or fight against the machine for your entire workout.
Foot Strap Position
The foot straps should sit across the widest part of your foot, just below the ball. If they’re too high on your toes, you’ll lack stability. Too low toward your arch, and you’ll restrict your ankle flexibility. Most rowing machines have numbered settings – experiment to find your ideal position and remember it for next time.
Your heels will lift slightly at the catch position – this is completely normal and part of proper rowing machine form. Don’t strap yourself in so tightly that your heels can’t move. You want security without restriction.
Damper Setting: Not What You Think
That lever on the side of the flywheel housing isn’t a resistance or difficulty setting – it’s a damper that controls airflow, similar to the gears on a bicycle. A higher damper setting (7-10) makes each stroke feel heavier but isn’t necessarily better for cardio and strength training. A lower setting (3-5) often feels lighter per stroke but requires you to maintain momentum and technique.
Most rowing coaches recommend beginners start around 3-5. This allows you to focus on proper rowing machine form without fighting excessive resistance. Elite rowers often train at these same settings because they know technique matters more than brute force. You can always adjust based on your workout goals, but start conservative whilst you’re learning.
Common Mistakes to Avoid (And How to Fix Them)
Even with good intentions, certain errors creep into almost everyone’s rowing technique. Here’s how to spot and correct them.
Mistake 1: Shooting the Slide
Why it’s a problem: “Shooting the slide” means your seat moves backward during the drive phase whilst your shoulders stay in the same place – essentially, your legs finish extending before your upper body engages. This disconnects the kinetic chain and dramatically reduces power output. You’ll recognise this if the handle seems to move very little whilst your seat shoots back.
What to do instead: Focus on keeping your shoulders in front of the handle until your legs are nearly extended. Imagine there’s a rope connecting your shoulders to the handle – they should move together. Practise this by rowing with a very slow drive phase, counting “one-one-thousand” and ensuring your handle moves steadily throughout. This maintains proper rowing machine form and engages your entire body as a unit.
Mistake 2: Opening the Back Too Early
Why it’s a problem: Leaning back before your legs have finished their drive is similar to shooting the slide – it breaks the power sequence and puts strain on your lower back. Your back muscles are smaller and fatigue faster than your leg muscles, so asking them to do work that your legs should handle is inefficient and potentially painful.
What to do instead: Keep your core braced and torso angle constant until your legs reach about 80% extension. Only then should you start to swing back through vertical. A helpful cue: imagine someone has placed a hand on your chest at the catch position, and you need to push against it with your legs before you can lean back. This reinforces the leg-then-body sequence essential to proper rowing machine form.
Mistake 3: Hunching the Shoulders
Why it’s a problem: Rounded, hunched shoulders not only look awful but also create tension through your neck and upper back, reduce your power output, and can lead to headaches and shoulder pain. This often happens when people think too much about pulling with their arms rather than driving with their legs.
What to do instead: Before you even grab the handle, roll your shoulders back and down – as if you’re tucking your shoulder blades into your back pockets. Maintain this position throughout the stroke. At the finish position, your chest should be open and proud, not collapsed. If you find your shoulders creeping up toward your ears mid-workout, pause, reset, and consider reducing your stroke rate or damper setting until you can maintain proper rowing machine form throughout.
Mistake 4: Bending the Arms Too Early
Why it’s a problem: Your arms are the smallest and weakest link in the rowing chain. When you bend them early in the drive phase, you’re asking them to do work that your powerful leg and back muscles should handle. This not only limits your power but also leads to arm fatigue and potential elbow strain.
What to do instead: Think of your arms as ropes – they’re just connections between your body and the handle. Keep them straight (not locked, but straight) until your legs are fully extended and your torso has swung back. Only then do you pull the handle to your ribs. A useful drill: row with straight arms only for 10 strokes, focusing purely on the leg drive and body swing. Then add the arms back in, maintaining that feeling of legs-and-body doing the work.
Mistake 5: Rowing with Your Entire Body at Once
Why it’s a problem: Treating the rowing stroke as one simultaneous motion rather than a sequence means you’re not maximising the contribution from each muscle group. It’s like trying to shift a car into all gears at once – it simply doesn’t work efficiently. You’ll also find yourself rushing and losing the meditative rhythm that makes rowing such an excellent cardio and strength workout.
What to do instead: Slow everything down initially. Count out the sequence: “legs” (push), “body” (swing), “arms” (pull), then reverse for the recovery: “arms” (extend), “body” (over), “legs” (bend). Use a very gentle pace until this sequence becomes automatic. Once muscle memory takes over, you can increase your power and speed whilst maintaining proper rowing machine form. Many rowing coaches recommend the “pause drill” – row normally but add a one-second pause at the catch position and another at the finish. This breaks the stroke into manageable pieces and reinforces good habits.
Building Your Rowing Workout for Cardio and Strength
Now that you understand proper rowing machine form, let’s talk about how to structure workouts that deliver results. Rowing is unique because it simultaneously builds cardiovascular endurance and muscular strength – but only if you approach it strategically.
The Beginner’s Foundation (Weeks 1-3)
Your first priority is grooving perfect technique, not chasing distance or speed. Start with three sessions per week, allowing at least one rest day between workouts. Each session should last just 15-20 minutes initially.
Structure each session this way: Start with 5 minutes at a very comfortable pace – around 20 strokes per minute – focusing entirely on the sequence and positions we’ve discussed. You should be able to hold a conversation. Then do 3-5 intervals of 2 minutes at a moderate pace (22-24 strokes per minute) with 2 minutes of easy rowing in between. Finish with 3-5 minutes of cool-down rowing.
Monitor your form constantly during these early weeks. If you feel your technique deteriorating, slow down or take a break. Building habits with proper rowing machine form now prevents months of bad patterns later.
Intermediate Progression (Weeks 4-8)
Once the basic technique feels comfortable, you can extend your sessions to 25-35 minutes and increase intensity. Continue with three sessions weekly, but vary the focus. According to research published in the Journal of Sports Sciences, varied training stimulus produces better adaptations for both cardio and strength than repeating identical workouts.
Try this weekly structure: Session one focuses on steady-state cardio – 20-30 minutes at a consistent moderate pace (24-26 strokes per minute), maintaining proper rowing machine form throughout. This builds your aerobic base. Session two emphasises intervals – try 8-10 rounds of 1 minute hard (28-30 strokes per minute) with 1 minute easy recovery. Session three combines both – 10 minutes steady, followed by 5 x 2 minutes at tempo pace (slightly harder than comfortable) with 90 seconds recovery, then 5 minutes cool-down.
Something worth considering: a basic fitness tracker can help you monitor your heart rate during these sessions. Look for one that’s water-resistant (you’ll be sweating) and provides clear heart rate zones. This helps ensure you’re working at the right intensity without constantly checking your pulse manually.
Advanced Training Approaches
After two months of consistent practice, you’re ready for more sophisticated programming. At this stage, proper rowing machine form should feel natural enough that you can focus on pushing your limits.
Consider adding a fourth weekly session and increasing session length to 35-45 minutes. Introduce pyramid intervals: 1 minute hard, 1 minute easy, 2 minutes hard, 2 minutes easy, 3 minutes hard, 3 minutes easy, then back down the pyramid. Or try distance challenges: row 5000 metres at the fastest pace you can maintain with good form, then track your time and try to beat it every few weeks.
For maximum strength benefit, incorporate power intervals: 10 strokes at maximum effort (damper setting 6-8), 20 strokes easy recovery, repeat 10-15 times. These short bursts of high intensity build explosive power whilst giving you ample recovery to maintain technique.
Your First Month Action Plan
Let’s make this concrete. Here’s exactly what to do over your first 30 days of rowing with proper rowing machine form.
- Week 1 – Foundation Setting: Three sessions of 15 minutes each. Spend the first 5 minutes of every session practising the catch and finish positions whilst stationary – hold each for 30 seconds, checking your body alignment. Then row very gently for 10 minutes at 18-20 strokes per minute. Your only goal is making the sequence automatic: legs-body-arms, arms-body-legs. Record your sessions in your phone notes, including how the movement felt.
- Week 2 – Building Rhythm: Three sessions of 20 minutes each. Add interval work: 5-minute easy warm-up, then 5 x 2 minutes at moderate pace (22-24 strokes per minute) with 2 minutes easy recovery between each. Cool down for 5 minutes. Film yourself from the side on one session and check your form against the four phases we discussed earlier. Make adjustments based on what you see.
- Week 3 – Increasing Duration: Three sessions of 25 minutes each. Session A: 20 minutes steady-state at 24 strokes per minute, then 5-minute cool-down. Session B: 5-minute warm-up, 10 x 1 minute harder efforts (26-28 strokes per minute) with 1 minute easy between each. Session C: 15 minutes at conversational pace, focusing purely on perfecting your recovery phase – slow, controlled, deliberate. Notice how proper rowing machine form during recovery makes the next drive phase more powerful.
- Week 4 – Testing Progress: Three sessions of 25-30 minutes each. Start with the same structure as Week 3 for your first two sessions. For your third session, do a benchmark test: after a 5-minute warm-up, row 2000 metres as fast as you can whilst maintaining good form. Record your time and average stroke rate. This becomes your baseline for measuring improvement. Don’t race out too fast – pace yourself so you can sustain the effort. Finish with a 5-minute cool-down.
By the end of this month, you’ll have established approximately 6 hours of quality practice with proper rowing machine form. Your cardiovascular fitness will have noticeably improved, and you’ll feel stronger through your legs, core, and back. More importantly, you’ll have built a solid technical foundation that allows you to continue progressing safely for years to come.
Enhancing Your Rowing Setup
Whilst the rowing machine itself provides everything you need, a few simple additions can make your training more comfortable and effective.
Many people find that thin rowing gloves or cycling gloves help prevent calluses if you’re training frequently. Look for ones with padding on the palm but good grip on the fingers. They’re not essential, but they can extend your training comfort, especially during longer sessions where your hands might otherwise become sore.
The seat on most rowing machines is functional but hardly luxurious. If you’re finding it uncomfortable during longer workouts, a simple seat cushion designed for rowing machines can transform your experience. Look for one that’s thin enough not to compromise your form but padded enough to reduce pressure points. That said, some initial discomfort is normal as your body adapts – only invest in a cushion if discomfort persists beyond your first few weeks.
For tracking progress, most modern rowing machines have built-in monitors that display time, distance, stroke rate, and calories. These are perfectly adequate for monitoring your workouts. However, if you’re serious about progression, tracking your wattage output and split times (time per 500 metres) gives you more precise data. This information is already on most machine displays – you just need to start paying attention to it.
Troubleshooting Your Technique
Even with detailed instruction, you might encounter specific challenges as you develop proper rowing machine form. Here’s how to address them.
Issue: Back Pain During or After Rowing
Lower back pain typically indicates one of two problems: you’re rounding your back during the catch phase, or you’re opening your back too early during the drive. The solution is to strengthen your core engagement and ensure your back maintains its natural curve throughout the stroke. Try this: before grabbing the handle, brace your core as if someone’s about to poke you in the stomach. Maintain that bracing throughout your entire rowing session. If pain persists, reduce your damper setting and session length until your core strength catches up to the demands of the movement.
Issue: Knee Discomfort
Knee pain usually stems from two sources: incorrect foot positioning or letting your knees collapse inward during the drive. Check that your foot straps are positioned correctly across the ball of your foot. During the drive phase, actively think about pushing your knees outward slightly – they should track in line with your toes, not diving toward each other. If you have existing knee issues, rowing is generally very knee-friendly when performed with proper rowing machine form, but start conservatively and build gradually.
Issue: Running Out of Breath Quickly
If you’re gasping for air within the first few minutes, you’re probably rowing too fast or too hard for your current fitness level. Remember, proper rowing machine form isn’t about maximum speed – it’s about powerful, controlled strokes. Slow down your stroke rate to 20-22 strokes per minute and focus on the recovery phase being twice as long as the drive phase. This creates natural breathing rhythm: exhale powerfully during the drive, inhale during the recovery. As your cardiovascular fitness improves over weeks and months, you’ll naturally be able to sustain higher intensities.
Issue: Handle Hitting Your Knees on the Recovery
This is one of the most common technical faults and the fix is simple: extend your arms fully before you lean your torso forward, and only bend your knees after your hands have passed them. Practise the “arms-body-legs” recovery sequence in slow motion. You can even place a small object on your thighs – if the handle bumps it, you’re bending your knees too early. Be patient with this one; it often takes a few sessions for the correct sequence to become automatic.
The Science Behind Rowing’s Effectiveness
Understanding why rowing delivers such impressive results for cardio and strength helps maintain motivation when workouts feel challenging. Research from the University of Oxford’s Department of Physiology has shown that rowing engages approximately 85% of your body’s muscles in every stroke – far more than running, cycling, or most other cardio machines.
Your quadriceps, hamstrings, and glutes provide the primary power during the leg drive. The core muscles – rectus abdominis, obliques, and erector spinae – stabilise your spine and transfer power from your lower body to your upper body. Your lats, rhomboids, and trapezius muscles in your back pull the handle, whilst your biceps and forearms finish the movement. Even your calves, shoulders, and chest contribute to maintaining proper rowing machine form throughout the stroke.
From a cardiovascular perspective, rowing can elevate your heart rate to 85-95% of maximum during high-intensity intervals, providing excellent conditioning for your heart and lungs. The NHS recommends 150 minutes of moderate-intensity aerobic activity weekly, and rowing efficiently contributes to this target whilst simultaneously building functional strength.
What makes rowing particularly valuable is the eccentric loading – your muscles work both during the powerful drive phase and the controlled recovery phase. This builds strength differently than traditional weightlifting, focusing on muscular endurance and power rather than pure maximum strength. You’re essentially performing hundreds of bodyweight-loaded movements per session, which explains why regular rowers develop such defined backs, shoulders, and legs.
Quick Reference Checklist
Print or save this checklist and review it before each rowing session until proper rowing machine form becomes second nature:
- Position foot straps across the widest part of your feet, just below the ball
- Start with damper setting between 3-5 until technique is solid
- At the catch: shins vertical, shoulders in front of hips, arms straight, core engaged
- Drive sequence: push hard with legs first, then swing torso back, finally pull arms to lower ribs
- At the finish: legs extended, torso at 11 o’clock lean, handle at lower ribs, shoulders relaxed
- Recovery sequence: extend arms first, then torso forward, finally bend knees
- Maintain 1:2 ratio – drive phase takes one second, recovery takes two seconds
- Keep stroke rate between 20-26 per minute whilst building technique
- Monitor your split time (time per 500m) and wattage rather than just calories
- Film yourself quarterly to check form hasn’t degraded
- If form deteriorates mid-session, slow down or take a 30-second break to reset
- Focus on powerful, deliberate strokes rather than speed or volume
Frequently Asked Questions
How long should I row as a beginner without hurting myself?
Start with just 15-20 minutes per session, three times weekly, with at least one rest day between sessions. Your cardiovascular system might feel ready for more, but your muscles, tendons, and joints need time to adapt to the rowing motion. Increase duration by no more than 10% each week. By week six, you can comfortably row for 30-35 minutes if you’ve maintained proper rowing machine form throughout. Listen to your body – muscle fatigue is normal, but joint pain signals you need to scale back and review your technique.
Is rowing better than running for weight loss and fitness?
Rowing offers distinct advantages for certain individuals. It burns similar calories to running (450-600 per hour depending on intensity) but with zero impact on your joints, making it ideal for people with knee or hip issues. More significantly, rowing builds muscle whilst running primarily builds cardiovascular endurance. This muscle development increases your resting metabolic rate, meaning you burn more calories even when not exercising. That said, the “best” exercise is the one you’ll actually do consistently – if you love running, keep running. If joint issues or boredom with running are holding you back, rowing might be your perfect solution.
Do I need expensive equipment or can I row at a basic gym?
Any rowing machine that provides smooth resistance will work perfectly for developing proper rowing machine form and building fitness. The monitors on basic gym rowing machines display everything you need: time, distance, stroke rate, and split times. Whilst high-end models offer better screens and connectivity features, they don’t make your workout more effective. If you’re considering buying one for home use, prioritise machines with air resistance over magnetic resistance – they better simulate real rowing and allow you to control resistance through your own effort rather than fixed settings.
How do I know if I’m working hard enough during my rowing sessions?
A good rule for moderate-intensity rowing (which should comprise about 70% of your training): you should be able to speak in short sentences but not hold a flowing conversation. Your breathing should be noticeably elevated but controlled. For technical guidance, monitor your split time – the time it takes you to row 500 metres. If you can maintain a consistent split time throughout a 20-minute session, that’s your current sustainable pace. During interval training, aim to drop that split time by 10-15 seconds during work periods. Your wattage output (displayed on most monitors) should be 150-200 watts for moderate intensity if you’re a beginner, increasing as you develop fitness and strength.
When will I start seeing results from rowing with proper form?
You’ll notice cardiovascular improvements within 2-3 weeks – stairs become easier, your resting heart rate drops slightly, and you recover faster between intervals. Visible muscle definition in your back, shoulders, and legs typically appears after 6-8 weeks of consistent training (three or more sessions weekly). For weight loss, expect to lose 0.5-1kg per week if you’re rowing regularly and maintaining a moderate calorie deficit. The key is consistency: three 30-minute sessions weekly will deliver dramatically better results than occasionally rowing for an hour. Track your benchmark times rather than relying solely on the mirror – objective improvements in your 2000m time or average wattage output are more reliable indicators of progress and incredibly motivating.
Conclusion: Your Rowing Journey Starts Now
Mastering proper rowing machine form transforms this often-overlooked piece of equipment into your most versatile training tool. Unlike machines that isolate single muscle groups or cardio equipment that neglects strength development, rowing with correct technique delivers comprehensive fitness benefits in remarkably efficient sessions.
The four phases – catch, drive, finish, recovery – might feel awkward initially, but within three weeks of conscious practice, the sequence becomes automatic. Your body learns to generate power from your legs, transfer it through your core, and finish with your arms in one fluid motion. That’s when rowing shifts from feeling like work to feeling like meditation with a heart rate monitor.
Remember these essential points: start with conservative session lengths and damper settings whilst you groove your technique. Focus on the sequence rather than speed. Film yourself periodically to catch form deterioration before it becomes habitual. And trust the process – proper rowing machine form might mean slower initial progress, but it’s building a foundation that prevents injury and allows continuous improvement for years to come.
Your first session won’t be perfect. Your tenth session will still have moments of awkwardness. But by your twentieth session, you’ll understand why rowing enthusiasts become so passionate about this movement. You’ve got everything you need to start: a rowing machine at your gym or home, this guide, and 15 minutes. Set up your foot straps, adjust that damper to 4, and take your first stroke with confidence. The hardest part is always beginning. Future you – stronger, fitter, and more capable – will thank you for starting today.


