You bought a foam roller with the best intentions. Maybe it’s gathering dust in the corner of your bedroom, or perhaps you’ve given it a halfhearted go and ended up wincing in pain, wondering if you’re doing more harm than good. Learning how to foam roll correctly makes the difference between an effective recovery tool and an expensive floor ornament.
Picture this: It’s Sunday evening after a grueling Saturday gym session. Your quads are screaming, your IT band feels like concrete, and climbing stairs has become a full-body effort. You know that foam roller could help, but every time you’ve tried, it either hurt like hell or did absolutely nothing. Sound familiar? Thousands of gym-goers across the UK face this exact frustration, convinced foam rolling is either torture or useless.
You may also enjoy: Active Recovery Workouts That Actually Speed Up Muscle Repair
Common Myths About Foam Rolling for Recovery
Before we dive into the proper technique, let’s clear up some dangerous misconceptions that might be sabotaging your recovery.
Myth: The more pain you feel, the better it’s working
Reality: Gritting your teeth through excruciating pain isn’t brave, it’s counterproductive. When foam rolling causes severe pain, your muscles tense up as a protective response, which defeats the entire purpose. Research from the Journal of Athletic Training shows that moderate pressure (around a 5-7 on the pain scale) produces the best results for muscle recovery. Going beyond that triggers your body’s defence mechanisms rather than promoting relaxation and blood flow.
Myth: You should roll directly on joints and bones
Reality: Your foam roller should target muscle tissue, not joints, bones, or your lower back. Rolling over your spine, knees, or hip bones can cause injury and doesn’t contribute to muscle recovery. The NHS advises focusing on large muscle groups and avoiding bony prominences entirely. When you foam roll correctly, you’re working on the soft tissue between joints.
Myth: Faster rolling equals better results
Reality: Speed matters, and slower is almost always better. Rushing through foam rolling means you miss trigger points and don’t give your fascia time to respond. Studies indicate that spending 30-60 seconds on each muscle group with slow, controlled movements produces significantly better outcomes than quick back-and-forth motions. Think of it as a massage, not a race.
Why Proper Foam Rolling Technique Matters for Muscle Recovery
Understanding how to foam roll correctly isn’t just about avoiding pain. It’s about maximizing the recovery benefits your body desperately needs after training.
When you exercise, your muscles develop microscopic tears and accumulate metabolic waste products. Your fascia, the connective tissue surrounding muscles, can become tight and restricted. This combination leads to that familiar post-workout stiffness that makes you walk like you’ve aged thirty years overnight.
Proper foam rolling technique addresses these issues through myofascial release. By applying sustained pressure to tight muscle tissue, you increase blood flow, reduce muscle tension, and help break up adhesions in the fascia. Research published in the International Journal of Sports Physical Therapy found that foam rolling can reduce muscle soreness by up to 30% when performed correctly within 72 hours post-exercise.
But here’s what makes the technique crucial: rolling incorrectly can compress nerves, strain already-damaged tissue, and leave you sorer than when you started. Learning to foam roll correctly ensures you’re enhancing recovery rather than hindering it.
The Essential Foam Rolling Technique for Effective Recovery
Right, let’s get into the specifics of how to foam roll correctly. These principles apply whether you’re targeting your quads, hamstrings, calves, or upper back.
Positioning Your Body Weight
Body position determines how much pressure you apply. Start by supporting some of your weight with your hands or opposite leg. As a beginner, you might only put 30-40% of your body weight onto the roller. This gives you control and prevents that excruciating pain that makes you want to give up entirely.
For example, when rolling your hamstrings, sit on the floor with the roller under your thighs. Place your hands behind you for support. This allows you to adjust pressure by shifting weight between your arms and legs. Too intense? Support more weight with your arms. Not enough pressure? Lean back slightly.
Rolling Speed and Direction
Move slowly. Seriously slowly. Aim for about one inch per second. When you foam roll correctly, you’re giving your nervous system time to respond and your muscles time to release tension.
Roll in the direction of your muscle fibres when possible, but don’t obsess over this. The key is maintaining that slow, controlled pace. When you hit a particularly tender spot (often called a trigger point), pause there for 20-30 seconds. Breathe deeply and allow the muscle to soften under the pressure.
Breathing Makes the Difference
Most people hold their breath when foam rolling, especially through uncomfortable bits. This increases muscle tension and works against your recovery goals.
Conscious breathing activates your parasympathetic nervous system, which promotes relaxation and recovery. Inhale deeply through your nose for four counts, then exhale slowly through your mouth for six counts. Maintain this breathing pattern throughout your foam rolling session. The oxygen delivery also supports the healing process at a cellular level.
How to Foam Roll Correctly for Different Muscle Groups
Related reading: The Complete Functional Fitness Guide: Build Real-World Strength for Everyday Life
Each muscle group requires slightly different positioning and technique. Let’s break down the most common areas that benefit from foam rolling for muscle recovery.
Quadriceps (Front of Thighs)
Lie face down with the foam roller positioned under your thighs, just above your knees. Support your upper body on your forearms. Slowly roll from just above your knee to the top of your thigh, stopping before your hip bone. This typically takes 30-45 seconds per leg.
For increased pressure, stack one leg on top of the other. For less pressure, keep both legs on the roller and distribute your weight evenly. Your quads take significant impact during running, cycling, and leg training, making them a priority for foam rolling technique.
Hamstrings (Back of Thighs)
Sit on the floor with the roller under your thighs. Place your hands behind you for support. Roll from just above the back of your knee to just below your glutes. Avoid rolling directly on the back of your knee.
Tight hamstrings affect everything from your running gait to your lower back comfort. According to research from Leeds Beckett University, regular hamstring foam rolling can improve flexibility by 10-15% over four weeks when performed consistently.
IT Band (Outer Thigh)
This one requires careful attention. Lie on your side with the roller positioned just below your hip. Support yourself with your bottom forearm and your top leg bent in front for stability. Roll from just below your hip to just above your knee.
The IT band itself is incredibly tough tissue that doesn’t release easily. When you foam roll correctly on this area, you’re actually targeting the muscles around it, particularly your tensor fasciae latae (TFL) and vastus lateralis. Keep pressure moderate because this area tends to be especially sensitive.
Calves
Sit on the floor with your legs extended and the roller under your calves. Place your hands behind you. Roll from just above your ankle to just below your knee. Cross one leg over the other for increased pressure on a single calf.
Runners, take note: calf tightness contributes to Achilles issues, shin splints, and plantar fasciitis. Regular calf rolling supports recovery and can prevent these common problems.
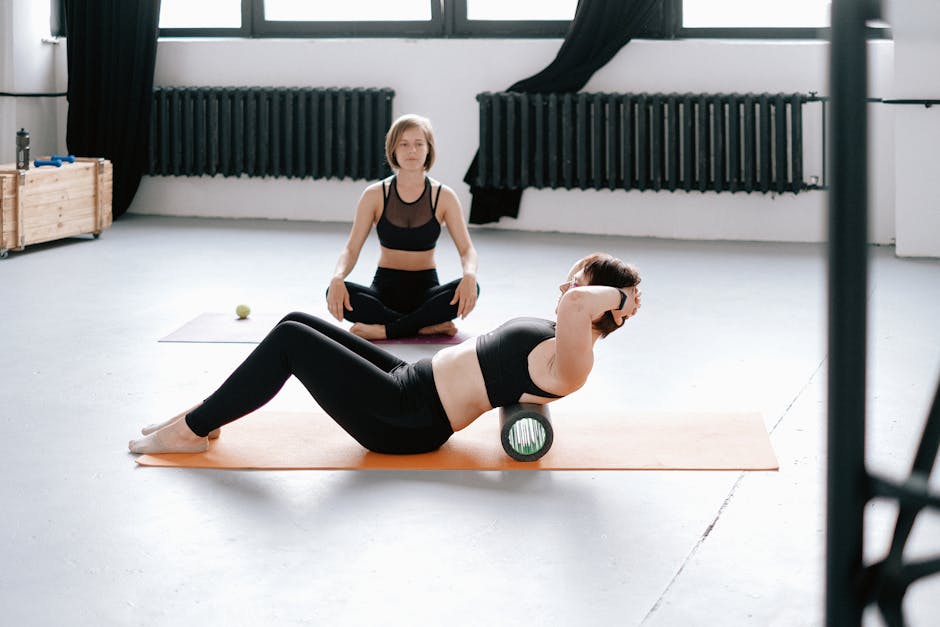
Upper Back
Lie on your back with the roller positioned between your shoulder blades. Cross your arms over your chest. Use your legs to push yourself slowly up and down, rolling from mid-back to just below your neck. Never roll your lower back or directly on your spine.
For desk workers dealing with upper back tension, this technique provides enormous relief. Just remember to keep your core engaged to protect your lower back during the movement.
Choosing the Right Equipment for Foam Rolling Recovery
Not all foam rollers work equally well for everyone. Understanding what to look for helps you foam roll correctly from the start.
Standard foam rollers typically come in different densities. Beginners benefit from softer foam that provides gentler pressure. As your tolerance builds, firmer rollers offer deeper tissue work. Look for something around 15cm in diameter and 30-90cm in length depending on which muscles you’re targeting.
Textured or ridged rollers can provide more targeted pressure on stubborn knots. However, start with a smooth surface until you’ve mastered proper technique. The texture shouldn’t be doing the work; your body positioning and movement should.
Some people find massage balls helpful for smaller areas like your glutes or shoulders. A standard tennis ball or something like a lacrosse ball works brilliantly for targeted trigger point release that’s difficult to achieve with a standard roller.
Your 7-Day Foam Rolling for Muscle Recovery Plan
Knowing how to foam roll correctly means nothing if you don’t actually do it. Here’s a realistic plan to build the habit around your training schedule.
- Day 1-2: Start with just 10 minutes post-workout. Focus on your two most sore muscle groups. Use lighter pressure and slower movements than you think necessary. Track how your muscles feel the next morning.
- Day 3-4: Extend your session to 15 minutes. Add a third muscle group. Experiment with your breathing pattern, aiming for that 4-count inhale and 6-count exhale. Notice which areas respond best to sustained pressure on tender spots.
- Day 5: Introduce a light foam rolling session on a rest day. This enhances recovery even when you haven’t trained. Spend 10 minutes on your tightest areas with gentle pressure. Many athletes report this feels surprisingly good when not dealing with fresh workout soreness.
- Day 6-7: Establish your rhythm. Roll for 10-15 minutes after intense training sessions, 5-10 minutes after moderate workouts, and optionally 5-10 minutes on rest days. Adjust pressure and duration based on your body’s feedback rather than following rigid rules.
Common Foam Rolling Mistakes That Sabotage Recovery
Even with good intentions, these errors prevent you from getting the full benefits of proper foam rolling technique.
Mistake 1: Rolling Too Quickly
Why it’s a problem: Rapid back-and-forth movements don’t give your fascia time to respond. You’re essentially just bouncing over problem areas rather than addressing them. This common mistake makes foam rolling feel pointless because you’re not actually promoting the tissue changes that support recovery.
What to do instead: Set a timer for 60 seconds per muscle group. Force yourself to move slowly enough that you can’t possibly finish in less time. Count to three with each small movement. This deliberate pace feels awkward initially but produces dramatically better results.
Mistake 2: Ignoring Your Body’s Signals
Why it’s a problem: Pushing through sharp, shooting pain or numbness can indicate you’re compressing a nerve or rolling over an injury. Your body sends these signals for good reason. Ignoring them can turn a minor issue into a significant problem requiring medical attention.
What to do instead: Use a 1-10 pain scale. Stay between 5-7 (uncomfortable but tolerable). If you hit an 8 or above, or experience any sharp/shooting sensations, reduce pressure immediately. Discomfort is normal; pain is a warning sign.
Mistake 3: Only Rolling After Intense Workouts
Why it’s a problem: Foam rolling exclusively when you’re incredibly sore means you’re always working with highly sensitized tissue. This makes sessions more painful and less effective. Recovery is a continuous process, not just damage control after brutal training.
What to do instead: Incorporate lighter foam rolling sessions on rest days and before workouts. Pre-workout rolling (5-10 minutes with moderate pressure) can improve range of motion and workout performance. Studies show this warm-up approach enhances muscle activation without reducing strength output.
Mistake 4: Neglecting Smaller Muscle Groups
Why it’s a problem: Everyone remembers to roll their quads and hamstrings, but smaller muscles like your hip flexors, glutes, and peroneals (outer lower leg) often harbour tension that affects your larger muscle groups. When you learn how to foam roll correctly, you address the whole kinetic chain.
What to do instead: Dedicate at least one session weekly to smaller, often-forgotten areas. Your glutes, for instance, contain trigger points that can refer pain down your entire leg. Rolling them properly requires different positioning than larger muscle groups but pays significant dividends for overall recovery.
Mistake 5: Using Foam Rolling as Your Only Recovery Method
Why it’s a problem: Foam rolling supports muscle recovery brilliantly, but it’s not magic. Without adequate sleep, proper nutrition, and appropriate rest between training sessions, no amount of rolling will fully restore your muscles. Recovery is multifaceted.
What to do instead: View foam rolling as one component of your recovery strategy. Combine it with 7-9 hours of quality sleep, adequate protein intake (1.6-2.2g per kg of body weight according to British Dietetic Association guidelines), proper hydration, and strategic rest days. Research from Loughborough University confirms this integrated approach produces superior recovery outcomes.
Save This: Your Foam Rolling for Recovery Essentials
- Roll slowly, spending 30-60 seconds on each muscle group with controlled movements
- Maintain steady breathing throughout, using a 4-count inhale and 6-count exhale pattern
- Keep pain levels between 5-7 on a 10-point scale for optimal tissue response
- Avoid rolling directly over joints, bones, or your lower back region
- Pause for 20-30 seconds on trigger points rather than constantly moving
- Schedule sessions within 72 hours post-exercise when foam rolling provides maximum benefit
- Support your body weight appropriately, using hands or opposite leg to control pressure
- Combine with adequate sleep and nutrition for comprehensive muscle recovery
Your Foam Rolling Questions Answered
How long should I spend foam rolling for muscle recovery?
Plan for 10-20 minutes depending on how many muscle groups need attention. Spending 30-60 seconds on each area provides sufficient stimulus for recovery benefits without overdoing it. Research from the Journal of Sports Science indicates that sessions longer than 20 minutes don’t produce significantly better results and may actually increase fatigue. Quality matters more than duration. When you foam roll correctly with proper technique and adequate pressure, even 10 minutes post-workout can substantially reduce next-day soreness.
When’s the best time to foam roll for maximum recovery benefits?
Immediately after training or within a few hours produces the best results for reducing delayed onset muscle soreness (DOMS). Studies show foam rolling within 72 hours of exercise significantly improves recovery markers. That said, light sessions on rest days also enhance circulation and mobility without requiring recent workout stimulus. Many UK athletes find evening foam rolling helps them sleep better, as the relaxation response from proper technique activates the parasympathetic nervous system. Experiment with timing to see what your body responds to best.
Can foam rolling replace stretching for flexibility?
Not entirely, though it complements stretching brilliantly. Foam rolling addresses fascial restriction and trigger points, while stretching elongates muscle tissue and improves joint range of motion. Research from the University of Stirling found that combining both methods produced superior flexibility gains compared to either alone. Think of foam rolling as preparation that makes your stretching more effective. When you foam roll correctly before stretching, you’re working with tissue that’s already released some tension, allowing deeper, more productive stretches.
Is it normal for foam rolling to feel really uncomfortable?
Absolutely. Discomfort is expected, especially when you’re addressing tight, overworked muscles. However, there’s a crucial difference between productive discomfort and harmful pain. The sensation should feel like a firm massage on tender muscles—intense but bearable. Sharp, shooting, or burning sensations indicate you’ve crossed into harmful territory. According to NHS musculoskeletal specialists, if you’re holding your breath, clenching your jaw, or tensing other body parts to cope with the sensation, you’re applying too much pressure. Learning how to foam roll correctly means finding that sweet spot where it’s uncomfortable enough to be effective but tolerable enough to maintain for the full duration.
Do I need an expensive foam roller for proper muscle recovery?
Simple foam rollers work perfectly well for most people. Basic models between £15-30 provide everything needed to foam roll correctly and support effective recovery. More expensive options might offer durability or specific textures, but they won’t fundamentally change your results if your technique is sound. Start with a standard smooth roller in medium density. Once you’ve mastered proper technique and understand how your body responds, you can explore textured versions or different densities if desired. The technique matters infinitely more than the equipment cost.
Moving Forward with Better Recovery
You now understand how to foam roll correctly, from positioning and pressure to breathing and timing. The difference between helpful recovery and wasted effort comes down to these specific techniques applied consistently.
Start tonight with one muscle group. Set a timer for 60 seconds. Roll slowly. Breathe deeply. Notice how different it feels when you apply these principles rather than rushing through it or torturing yourself with excessive pressure.
Recovery isn’t optional if you want to keep training consistently. Your muscles deserve the attention, and learning proper foam rolling technique is one of the most practical investments you can make in your fitness journey. That foam roller in the corner has work to do.


