Resistance band workouts changed everything for people stuck between “I need to exercise” and “I can’t face the gym today.” That elastic loop sitting in your drawer right now? It’s actually capable of delivering a proper full-body session that rivals what you’d get with a room full of equipment.
Related reading: Safe Strength Training During Pregnancy: Your Trimester-by-Trimester Guide.
Picture this: You’re staring at another grey Tuesday evening, knowing you should move your body but the thought of driving to the gym feels impossible. Traffic, parking, waiting for equipment, the aggressive air conditioning. Meanwhile, those colourful bands you bought last year are collecting dust somewhere near your trainers.
Let’s Bust Some Resistance Band Myths
Related reading: Full Body Resistance Band Workout: Your Complete Training Solution for Travel and Small Spaces
Myth: Bands are only for beginners or rehabilitation
Reality: Professional athletes and bodybuilders incorporate resistance band workouts into their training precisely because bands create constant tension throughout the entire movement. Unlike dumbbells, where tension drops at certain points, bands challenge your muscles from start to finish. Olympic weightlifters use them for a reason.
Myth: You can’t build real strength with bands
Reality: Progressive overload works identically with bands as it does with weights. Use thicker bands, add more loops, or slow your tempo. A study from the Journal of Human Kinetics found that resistance band training produced strength gains comparable to conventional weight training when matched for intensity. Your muscles can’t tell the difference between tension from iron and tension from rubber.
Myth: Band workouts are easier than “real” training
Reality: Try holding a resistance band squat at the bottom position for 30 seconds, then tell me how easy it feels. Bands eliminate momentum and cheating, forcing you to control every inch of movement. That’s harder, not easier.
Why Resistance Band Workouts Actually Work at Home
You might also enjoy: Outdoor Bodyweight Circuit Training: Your Park-Ready Fitness Solution.
The brilliance of resistance band workouts lies in their ability to create progressive tension. As you stretch the band further, resistance increases naturally. That means the hardest part of the exercise gets the most resistance, which is exactly when your muscles need it most.
Something worth noting: bands weigh almost nothing but can replicate exercises that typically require hundreds of pounds of equipment. Your entire home gym fits in a shoebox, travels on holiday, and costs less than a single month of gym membership.
According to NHS guidelines on physical activity, adults need strength training at least twice weekly. Resistance band workouts deliver that requirement without requiring you to navigate rush hour traffic or share sweaty equipment.
Bands also force better form. When you’re pulling a band apart during a chest press, you feel immediately if one side is working harder. That instant feedback helps correct imbalances before they become injuries. Free weights can mask those problems for months.
Your Complete Full-Body Resistance Band Workout
This routine hits every major muscle group in about 30 minutes. Perform it two to three times weekly, with at least one rest day between sessions. Choose a band thickness that makes the last three reps challenging but achievable.
Lower Body: Building Strength from the Ground Up
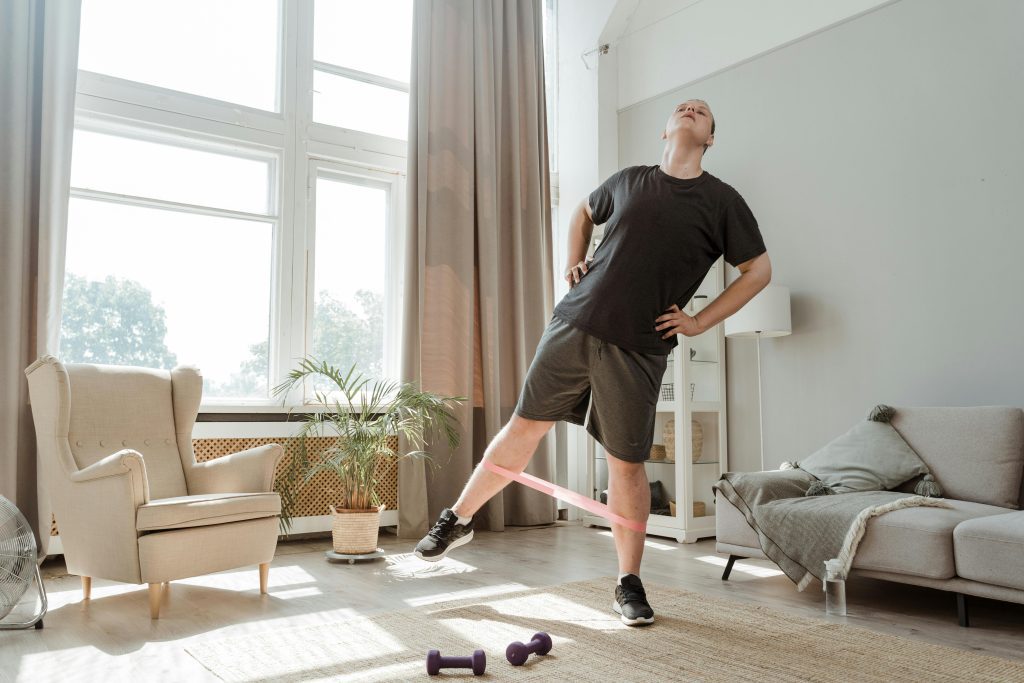
Banded Squats (3 sets of 12-15 reps): Step on the band’s centre with feet hip-width apart. Hold the ends at shoulder height, creating tension even at the starting position. As you squat down, the band pulls you forward, forcing your core and legs to work harder maintaining posture. Drive through your heels, pushing against both gravity and increasing band tension.
Single-Leg Deadlifts (3 sets of 10 reps each leg): Anchor the band under your right foot. Hold both ends in your left hand. Hinge at your hip, extending your right leg behind you as your torso lowers. The band creates resistance as you return upright, hammering your hamstrings and glutes while challenging balance. Switch sides.
Lateral Band Walks (3 sets of 15 steps each direction): Loop a small band around your thighs, just above your knees. Quarter-squat position, then step sideways, maintaining tension. Your outer glutes burn because they’re finally doing their actual job. Most people have weak glute medius muscles from sitting all day. This fixes that.
Upper Body: Chest, Back, and Shoulders
Banded Press-Ups (3 sets of 10-12 reps): Drape a resistance band across your upper back, holding the ends under your palms. Each press-up now fights additional resistance at the top, where you’re typically strongest. The band keeps tension through the entire movement, creating more time under load. Your chest, triceps, and shoulders feel this the next day.
Bent-Over Rows (3 sets of 12-15 reps): Stand on the band’s centre, feet shoulder-width apart. Hinge forward at your hips, back straight, holding the band ends with arms extended. Pull the band towards your lower ribs, squeezing your shoulder blades together. Research published in the British Journal of Sports Medicine emphasizes the importance of pulling exercises for shoulder health, especially for people who spend hours at desks.
Overhead Press (3 sets of 10-12 reps): Stand on the band, holding the ends at shoulder height. Press straight overhead, extending your arms fully. The increasing tension as you press up means your shoulders work harder at lockout. Control the descent, resisting the band’s pull back down.
Face Pulls (3 sets of 15 reps): Anchor the band at head height to something sturdy (a door anchor works brilliantly). Pull the band towards your face, separating your hands as they approach your ears. Squeeze your shoulder blades together. This movement counteracts hours of forward posture from phones and computers.
Core: Building Stability and Strength
Pallof Press (3 sets of 12 reps each side): Anchor the band at chest height. Stand perpendicular to the anchor point, holding the band with both hands at your chest. Press straight forward, resisting the band’s pull to rotate your torso. Your obliques work overtime maintaining position. Breathing matters here – exhale during the press, maintain tension throughout.
Banded Dead Bugs (3 sets of 10 reps each side): Lie on your back, loop a light band around your feet. Extend your legs upward, creating tension. Slowly lower one leg towards the floor while keeping the other extended, then switch. The band’s resistance forces your core to stabilize against the pull.
Anti-Rotation Holds (3 sets of 20-30 seconds each side): Same setup as the Pallof press, but hold the extended position. Your core fights to prevent rotation while your arms maintain the press. Feels deceptively simple until about 15 seconds in.
The 28-Day Progression Plan for Home Training
Starting resistance band workouts requires progression, not perfection. This plan builds capacity gradually while establishing consistency.
- Week 1: Perform the full routine once, focusing entirely on form. Use a lighter band than feels challenging. Film yourself if possible – seeing your movement reveals more than feeling it. Rest 90 seconds between sets. Total workout time: 35-40 minutes.
- Week 2: Add a second session, spacing workouts at least two days apart (Monday and Thursday works well). Increase band thickness slightly or add one extra rep per set. Notice which exercises feel awkward – that’s normal and useful information.
- Week 3: Progress to three sessions weekly. Reduce rest periods to 60 seconds between sets. The same workout becomes substantially harder with less rest. Add a fourth set to exercises that feel manageable.
- Week 4: Maintain three sessions. Increase resistance again or slow your tempo (three seconds down, one second up). Consider adding a resistance band set with multiple thickness options for continued progression.
Beyond week four, continue adding resistance, reps, or reducing rest. When you can complete all sets with good form and 30-second rest periods, you’ve outgrown that band thickness.
Mistakes to Avoid (And How to Fix Them)
Mistake 1: Using momentum instead of control
Why it’s a problem: Jerking movements with resistance bands creates inconsistent tension and increases injury risk. The band can snap back unexpectedly if you lose control, and you miss the primary benefit – constant muscle tension.
What to do instead: Count three seconds for the lowering phase of every exercise. Pause at full contraction. Control the band’s return rather than letting it pull you back to starting position. If you can’t maintain this tempo, you need a lighter band.
Mistake 2: Anchoring bands to unstable objects
Why it’s a problem: That wobbly door handle or lightweight furniture piece can’t handle the force you’re creating. A band snapping free under tension can cause injury, and you’ll develop terrible form compensating for unstable anchor points.
What to do instead: Use a proper door anchor designed for resistance bands (they’re about a tenner and work brilliantly), or anchor bands around solid, heavy furniture that won’t budge. Test your anchor point with gentle pulls before committing full force.
Mistake 3: Never progressing beyond the same band
Why it’s a problem: Your first band eventually becomes too easy. Muscles adapt to familiar stress within 4-6 weeks. Continuing with the same resistance maintains but doesn’t build strength.
What to do instead: Track your sessions. When you can complete all prescribed reps with 2-3 in reserve, progress. Add another band, use a thicker resistance level, or incorporate pause reps. Adaptation requires progressive challenge.
Mistake 4: Skipping warm-ups because “it’s just bands”
Why it’s a problem: Resistance band workouts still stress your joints and muscles significantly. Cold tissues are more prone to strains, and you’ll lift less effectively without proper preparation.
What to do instead: Spend five minutes before every session performing arm circles, leg swings, and light band pulls at 30% effort. Your working sets feel smoother, you’ll maintain better form, and recovery improves.
Making Resistance Band Workouts Actually Happen
Consistency beats intensity for long-term results. Creating an environment that supports regular training matters more than perfect programming.
Keep your resistance bands visible. Not tucked in a drawer, not buried in a cupboard. Hang them on a hook near where you spend evenings, or keep them by your bed. Environmental cues trigger behaviour more reliably than willpower.
Schedule sessions like appointments. “Sometime this week” never happens. “Tuesday and Thursday at 7pm” has a fighting chance. Set phone reminders 15 minutes before your session, giving you time to mentally prepare.
Create a dedicated space, even if tiny. A 2-by-2-metre area works fine. Clear it before your session – moving furniture becomes a warm-up. Having a defined training zone builds a psychological association between location and action.
The reality is that resistance band workouts succeed at home because they eliminate common barriers. No commute, no waiting, no judgment, no monthly fees. You’re removing friction from the equation.
Research in the Journal of Sports Sciences demonstrates that home-based resistance training produces similar adherence rates to gym-based programs when convenience is matched for intensity. Translation: if it’s equally hard but infinitely more convenient, you’ll actually do it.
Advanced Techniques for Continued Progress
Once basic resistance band workouts become routine, these techniques add new challenges without requiring additional equipment.
Tempo manipulation: Try four seconds lowering, two seconds pause, one second lifting. Time under tension increases dramatically. What was previously 12 comfortable reps becomes 8 brutal ones.
Unilateral training: Single-arm or single-leg variations expose and correct imbalances. Your dominant side can’t compensate, forcing weaker muscles to strengthen. Expect to use lighter resistance initially.
Band stacking: Loop two or three bands together for increased resistance. Ensure they’re equal length and thickness. This approach costs less than buying progressively heavier bands whilst providing more versatility.
Isometric holds: Pause at the hardest point of any exercise for 5-10 seconds. During a squat, hold the bottom position. During rows, hold at full contraction. Muscles develop strength at specific angles – isometrics target those angles precisely.
Complex sets: Pair two exercises back-to-back with no rest. Banded squats immediately followed by overhead presses challenges your cardiovascular system whilst building strength. Rest after completing both movements.
Save This: Your Resistance Band Workout Essentials
- Perform full-body resistance band workouts two to three times weekly with rest days between sessions
- Focus on controlling both the pulling and releasing phases of every movement
- Secure band anchor points properly before starting – test with light tension first
- Progress by increasing band thickness, adding reps, or reducing rest periods every 3-4 weeks
- Warm up for five minutes before every session, regardless of convenience
- Keep bands visible in your living space as environmental cues for consistent training
- Film your form periodically to catch compensation patterns before they become habits
- Schedule specific days and times rather than relying on motivation alone
Your Resistance Band Training Questions Answered
How long before I see actual results from resistance band workouts?
Strength improvements become noticeable within 3-4 weeks of consistent training. You’ll feel exercises becoming easier and notice daily tasks requiring less effort. Visible muscle changes typically appear around 6-8 weeks, though this varies based on nutrition, sleep, and training consistency. Strength develops faster than size, so trust the process even when the mirror seems unchanged.
Do I need multiple resistance levels or will one band work?
One band works initially, but investing in a set of three to five resistance levels costs around £15-25 and dramatically improves training versatility. Different muscle groups require different resistance – what challenges your legs barely bothers your biceps. Having options allows proper progression across all exercises rather than compromising some to accommodate others.
Can resistance bands replace gym training completely?
Yes, for most general fitness goals. Resistance band workouts build strength, muscle endurance, and cardiovascular fitness effectively for beginners through intermediate trainees. Advanced athletes or those pursuing specific strength sports may eventually need heavier loading, but the vast majority of people can achieve their goals entirely with bands. Convenience often matters more than marginal equipment advantages.
How do I know if my resistance band is worn out and unsafe?
Inspect bands before every session for small tears, rough patches, or discolouration. Stretch the band gently and look for inconsistent thickness or visible damage. If the band feels sticky or has a chalky residue, its integrity is compromised. Replace bands showing any wear – they’re inexpensive enough that caution outweighs thrift. Most quality bands last 1-2 years with regular use.
What if I feel the exercise in the wrong muscle group?
Feeling exercises in unintended areas usually indicates form breakdown or mobility limitations. Film yourself performing the movement, comparing your position to demonstration videos. Common issues include arching your back during presses (engages lower back instead of shoulders) or using momentum during rows (reduces back engagement). Reduce resistance, slow your tempo, and focus on deliberate muscle contraction. Consider posting form checks in online fitness communities for specific feedback.
Building Your Home Training Practice
Resistance band workouts succeed because they remove traditional exercise barriers whilst delivering genuine results. No commute, no crowds, no expensive memberships. Just you, an elastic loop, and 30 minutes.
The transformation happens gradually. Week one feels awkward. Week four feels natural. Week twelve, you’re stronger than when you had that gym membership you never used. That’s the deal – consistency compounds over time.
Start with the basic routine outlined here. Perform it twice this week, prioritizing form over intensity. Add the third session next week. Progress every month by increasing resistance or reducing rest periods.
Six months from now, you’ll either wish you’d started today or you’ll be grateful you did. Your choice is simple: close this tab and continue as before, or grab those bands and complete the first workout right now. Everything you need is already within reach.


