Picture yourself sitting cross-legged on the floor at a friend’s gathering when everyone suddenly decides to play a game that requires sitting on the ground. Your knees are screaming, your hips feel locked, and you’re secretly counting the seconds until you can unfold yourself and find a chair. Or perhaps you’ve tried to pick something up off the floor lately and felt that telltale tightness in your hamstrings that makes you move like the Tin Man before Dorothy found the oil can.
📖 Reading time: 16 minutes
You’re not alone. Research from the British Journal of Sports Medicine found that flexibility decreases by approximately 10% per decade after age 30, and with the average UK adult spending over 9 hours a day sitting, our bodies are becoming increasingly stiff and immobile. The good news? Yoga for flexibility can reverse this trend, and you don’t need to be naturally bendy or even particularly athletic to see real results. Within just two weeks of consistent practice, you can notice measurable improvements in your range of motion.
Common Myths About Yoga for Flexibility
For more on this topic, you might enjoy: Yoga for Beginners: Your No-Nonsense Guide to Getting Started.
Myth: You Need to Be Flexible to Start Yoga
Reality: This is like saying you need to be clean before taking a shower. Yoga for flexibility is specifically designed to help you become more flexible, regardless of your starting point. In fact, people who begin yoga with limited flexibility often see the most dramatic improvements. A study published in the International Journal of Yoga found that inflexible beginners gained an average of 35% more range of motion in their first eight weeks compared to those who started with above-average flexibility.
Myth: Stretching Should Hurt to Be Effective
Reality: Pain is actually counterproductive when working on flexibility through yoga. When you push into pain, your muscles activate a protective reflex that makes them contract rather than lengthen. Effective yoga for flexibility works in the “comfortable discomfort” zone—you should feel a gentle pulling sensation, but never sharp pain. The NHS guidelines on safe stretching emphasize that proper flexibility training should feel challenging but never agonizing.
Myth: Flexibility Results Take Months or Years
Reality: While deep, lasting flexibility does develop over time, you’ll notice differences much sooner than you think. Most people experience some improvement in flexibility after their very first yoga session due to the warming of muscles and temporary lengthening of connective tissue. With consistent practice—even just 15 minutes daily—you can achieve noticeable, lasting improvements within 2-3 weeks. Research from the University of Birmingham showed that participants who practiced yoga for flexibility three times per week increased their hamstring flexibility by 19% in just one month.
Why Yoga Works Better Than Static Stretching Alone
Related: The Complete Guide to Hamstring Stretches for Flexibility and Pain Relief.
You might wonder what makes yoga for flexibility more effective than simply stretching. The answer lies in how yoga combines multiple elements that traditional stretching often misses.
Traditional stretching typically isolates individual muscles, holding static positions for 15-30 seconds. Yoga for flexibility, however, addresses the entire fascial system—the connective tissue web that wraps around every muscle, bone, and organ in your body. When you move through yoga poses, you’re not just lengthening muscles; you’re hydrating and releasing restrictions in the fascia, which can have dramatic effects on your overall flexibility.
What’s more, yoga incorporates breath work that directly influences your nervous system. When you breathe deeply and slowly during yoga for flexibility, you activate your parasympathetic nervous system, which signals your muscles that it’s safe to relax and release. This is why you can often sink deeper into a pose after several breaths than you could when you first entered it.
According to research from NHS guidelines on yoga practice, the mindful, breath-focused approach of yoga also helps you develop better body awareness, allowing you to distinguish between productive stretching and potentially harmful straining—a skill that serves you well beyond your yoga mat.
The 7 Most Effective Yoga Poses for Building Flexibility
These seven poses target the areas where most people need flexibility the most: hips, hamstrings, shoulders, and spine. Practice them in this sequence for a complete flexibility session, or incorporate individual poses into your daily routine.
1. Downward-Facing Dog (Adho Mukha Svanasana)
This foundational pose stretches your entire posterior chain—hamstrings, calves, spine, and shoulders—making it one of the most efficient poses for overall flexibility. Start on your hands and knees, tuck your toes, and lift your hips toward the ceiling, forming an inverted V-shape with your body.
Don’t worry if your heels don’t touch the floor initially; that’s normal for most beginners. Instead, focus on lengthening your spine and gently pressing your chest toward your thighs. Bend your knees slightly if needed to keep your back straight—a straight spine with bent knees does more for flexibility than a rounded back with straight legs.
Hold for 5-8 breaths, pedaling your feet alternately to gently stretch each calf. As you practice yoga for flexibility regularly, you’ll notice your heels gradually moving closer to the floor over several weeks.
2. Low Lunge (Anjaneyasana)
The hip flexors—muscles at the front of your hips—become chronically tight from sitting, affecting your posture, gait, and lower back health. The low lunge directly addresses this common problem area.
From hands and knees, step your right foot forward between your hands, then lower your left knee to the ground. Keep your right knee directly over your ankle, and gently shift your hips forward until you feel a stretch in the front of your left hip and thigh. Raise your arms overhead if that feels comfortable, which deepens the stretch.
The key to effective hip flexibility through this pose is consistency rather than intensity. Hold for 6-8 breaths on each side, and practice this daily if possible. Many people find that having a folded blanket or something similar under their back knee makes this pose more comfortable, especially on hard floors.
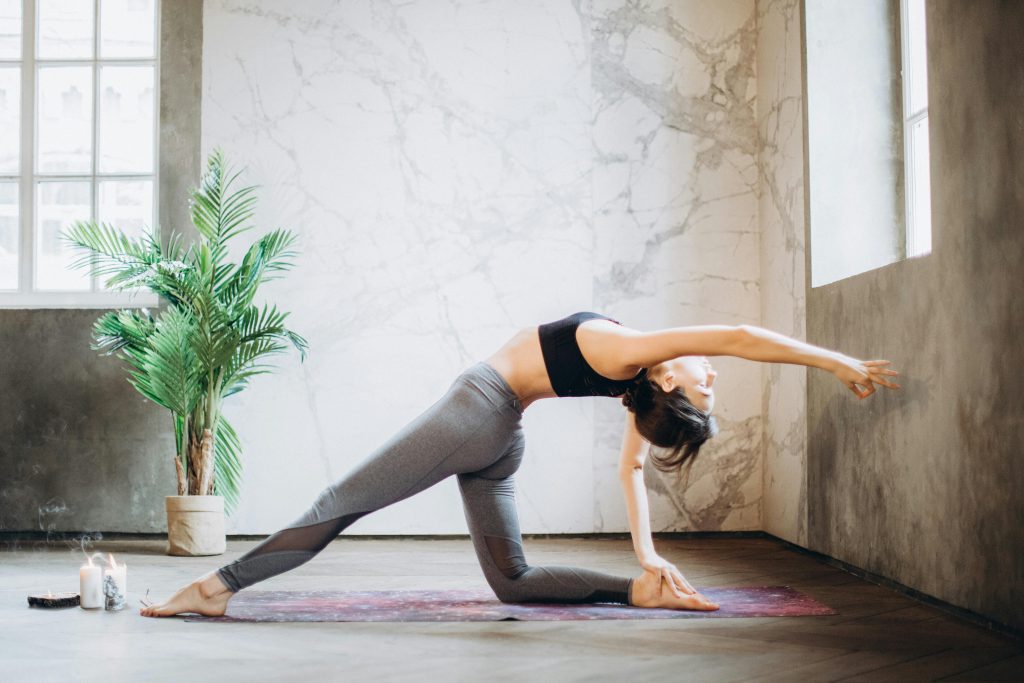
3. Pigeon Pose (Eka Pada Rajakapotasana)
If you could only choose one pose for hip flexibility, pigeon pose would be a strong contender. It targets the external hip rotators and glutes—muscles that become restricted from sitting and contribute to lower back pain and restricted movement.
Start on hands and knees, then bring your right knee forward and place it behind your right wrist, with your right ankle near your left wrist. Extend your left leg straight behind you. Your right shin might be parallel to the front of your mat, or it might be at an angle—both are fine. The important thing is that you feel a stretch in your right hip and glute without any knee pain.
You can stay upright or fold forward over your front leg, resting on your forearms or extending your arms fully. This is often an intense stretch, so breathe deeply and give yourself time—hold for 8-10 breaths on each side. Research from the British Journal of Sports Medicine on flexibility training indicates that longer holds (60-90 seconds) in intense stretches like pigeon pose produce greater improvements in range of motion.
4. Seated Forward Fold (Paschimottanasana)
This classic yoga for flexibility pose targets your entire posterior chain, particularly your hamstrings and lower back. Sit with your legs extended straight in front of you, feet flexed. Inhale and lengthen your spine, then exhale and hinge forward from your hips, reaching toward your feet.
Here’s the crucial point most people miss: your goal isn’t to touch your toes—it’s to maintain a straight spine while folding forward from the hips. If your back rounds as you reach forward, you’ve gone too far. Instead, imagine your belly button moving toward your thighs rather than your forehead moving toward your knees.
You might only fold forward a few inches initially, and that’s perfectly fine. Hold wherever you feel a moderate stretch for 8-10 breaths, lengthening your spine on each inhale and deepening slightly on each exhale. Over time, gravity and breath work together to increase your flexibility.
5. Thread the Needle (Parsva Balasana)
Upper back tightness and shoulder restriction plague desk workers throughout the UK. This gentle twist opens your shoulders, chest, and upper back while being accessible even for beginners to yoga for flexibility.
Start on hands and knees in a tabletop position. Slide your right arm underneath your left arm, lowering your right shoulder and ear to the ground. Your left hand can stay planted, or you can extend it overhead for a deeper stretch. You should feel a gentle stretch across your upper back and right shoulder.
Hold for 6-8 breaths, then repeat on the other side. This pose is particularly beneficial if you spend long hours hunched over a computer or phone, as it counteracts that forward-rounded posture that contributes to chronic stiffness.
6. Supine Spinal Twist (Supta Matsyendrasana)
Spinal flexibility is crucial for everyday movements—getting in and out of cars, looking over your shoulder while driving, reaching for items on shelves. This gentle twist improves spinal mobility while stretching your hips, chest, and shoulders.
Lie on your back and hug your right knee into your chest, then guide it across your body to the left side, extending your right arm out to the side. Your left hand can rest gently on your right knee. Turn your head to the right to complete the twist, or keep it neutral if turning feels uncomfortable.
The beauty of this yoga for flexibility pose is that gravity does most of the work. Simply relax and breathe for 8-10 breaths per side, allowing your body to gradually release tension. You might notice yourself settling deeper into the twist as you hold it—that’s your nervous system recognizing it’s safe to let go.
7. Reclining Hand-to-Big-Toe Pose (Supta Padangusthasana)
This hamstring stretch offers more control and safety than standing forward folds because you’re lying down, eliminating strain on your lower back. Lie on your back with both legs extended. Lift your right leg and hold behind your thigh, or loop a belt or towel around the ball of your foot.
Gently straighten your right leg as much as comfortable, keeping your left leg extended on the floor with the foot flexed. Your right leg doesn’t need to be perfectly straight—work at the edge of your current flexibility. The beauty of using a strap or towel is that it allows you to maintain proper alignment while accommodating your current flexibility level.
Hold for 8-10 breaths per side. As you become more flexible through regular yoga practice, you’ll gradually need less assistance from the strap, eventually being able to hold your big toe or foot directly.
Your First Two Weeks: A Progressive Action Plan
Starting a yoga for flexibility practice can feel overwhelming, so this plan breaks it down into manageable daily commitments. Each session should take 15-20 minutes.
- Days 1-3: Practice just three poses—Downward-Facing Dog, Low Lunge (both sides), and Supine Spinal Twist (both sides). Hold each pose for 5 breaths. Focus on learning proper alignment rather than pushing for depth. Take photos of yourself in each pose to track your progress.
- Days 4-6: Add Seated Forward Fold and Thread the Needle to your routine. You’re now practicing five poses. Increase holds to 6-8 breaths each. Notice which poses feel most challenging—these indicate your areas of greatest restriction and where you’ll see the fastest improvement.
- Days 7-9: Add Pigeon Pose to your sequence. All six poses now, holding for 8 breaths each. Start a simple journal noting what you notice: Are your hips less stiff when you stand up? Can you bend forward a bit further than before?
- Days 10-12: Complete the sequence by adding Reclining Hand-to-Big-Toe Pose. Practice all seven poses. By now, you should notice tangible differences—perhaps you’re bending slightly deeper in Forward Fold, or your heels are closer to the floor in Downward Dog.
- Days 13-14: Practice the full sequence, increasing holds to 10 breaths per pose. Take photos in the same poses you photographed on Day 1. Most people are surprised by the visible progress they’ve made in just two weeks of consistent yoga for flexibility.
After these two weeks, continue practicing 4-5 times per week to maintain and build upon your improvements. According to Sport England research on physical activity, consistency matters more than duration—15 minutes daily produces better results than an hour once weekly.
Mistakes to Avoid (And How to Fix Them)
Mistake 1: Bouncing or Using Momentum
Why it’s a problem: Ballistic stretching (bouncing) triggers your stretch reflex, causing muscles to contract protectively rather than lengthen. This can actually decrease flexibility over time and increases injury risk. Yoga for flexibility relies on gentle, sustained holds that allow muscles to gradually release.
What to do instead: Move into poses slowly and hold them still. Use your breath as your movement—deepen slightly on exhales, but maintain position on inhales. If you feel the urge to bounce, it means you’ve pushed too deep; back off slightly to where you can hold comfortably still.
Mistake 2: Practicing Only When You Feel Tight
Why it’s a problem: Flexibility develops through consistent, regular practice, not intensive occasional sessions. Sporadic practice means you’re constantly starting over, as flexibility gains diminish within 72 hours without maintenance. Think of it like learning a language—short daily practice beats marathon monthly sessions every time.
What to do instead: Schedule your yoga for flexibility practice at the same time each day, making it a non-negotiable appointment with yourself. Morning practice energizes you for the day ahead, while evening practice helps release accumulated tension. Even 10 minutes daily produces better results than 60 minutes once weekly.
Mistake 3: Holding Your Breath
Why it’s a problem: Breath-holding activates your stress response and causes muscles to tense, working directly against your flexibility goals. When you hold your breath, you signal to your nervous system that you’re in danger, triggering protective muscle guarding.
What to do instead: Make breath awareness your top priority in yoga for flexibility. Count your breaths as you hold poses—this keeps you breathing and provides a timer. Aim for slow, smooth breaths that fill your belly rather than shallow chest breathing. When you catch yourself holding your breath, it’s a sign you’ve pushed too far; ease back slightly.
Mistake 4: Comparing Yourself to Others or Online Images
Why it’s a problem: Everyone’s body structure, flexibility baseline, and rate of progress differs dramatically. Your hip sockets might be shaped differently from someone else’s, meaning certain poses will always look different on your body—and that’s completely normal. Comparison creates frustration and can push you to force poses unsafely.
What to do instead: Compare yourself only to yourself. Take photos on Day 1 and review them monthly to see your personal progress. Remember that the person on Instagram demonstrating advanced yoga poses has likely practiced for years and may have natural anatomical advantages. Your flexibility journey is yours alone.
Mistake 5: Skipping the Warm-Up
Why it’s a problem: Cold muscles and connective tissue are more prone to injury and don’t stretch as effectively. Attempting deep yoga for flexibility poses without warming up is like trying to stretch a cold rubber band—it’s stiff and might snap. Warm tissue is more pliable and responsive to stretching.
What to do instead: Spend 3-5 minutes warming up before your flexibility work. March in place, do arm circles, perform gentle cat-cow movements, or take a brief walk. Alternatively, practice yoga for flexibility after other physical activity when your body is already warm, or take a warm shower first to increase tissue temperature and blood flow.
Essential Tips to Maximize Your Flexibility Progress
Beyond the poses themselves, several factors significantly influence how quickly you’ll gain flexibility through yoga practice.
Time Your Practice Strategically
Your body’s flexibility naturally fluctuates throughout the day. Most people are stiffest first thing in the morning and most flexible in late afternoon or early evening, when body temperature peaks. However, morning yoga for flexibility practice, despite the initial stiffness, can relieve tension and improve your energy throughout the day.
If your primary goal is maximum range of motion to measure progress, practice in the evening. If you want to relieve stiffness and feel better all day, practice first thing in the morning—just be extra gentle and patient with yourself.
Consider Your Environment
Temperature significantly affects flexibility. Practicing yoga for flexibility in a comfortably warm room (around 20-22°C) enhances muscle pliability and allows deeper, safer stretching. Many people find that practicing in cooler rooms requires more warm-up time and limits their depth in poses.
A supportive surface matters too. Practising on a yoga mat provides cushioning for your joints while offering enough grip to prevent sliding. If you don’t have a mat initially, a large towel on carpet works, though you might find that investing in a proper mat makes your practice more comfortable and something with good cushioning helps if you have sensitive knees.
Stay Consistently Hydrated
Fascia—the connective tissue that yoga for flexibility addresses—is approximately 70% water. When you’re dehydrated, fascia becomes sticky and restricted, limiting your flexibility potential. Research from Loughborough University found that even mild dehydration (just 1-2% body water loss) noticeably reduces athletic performance and recovery.
Drink water consistently throughout the day rather than chugging large amounts right before practice. The NHS recommends 6-8 glasses daily, with more needed if you’re active or it’s warm weather.
Combine Active and Passive Stretching
Yoga for flexibility naturally incorporates both active stretching (using muscle engagement to create stretch) and passive stretching (using gravity or props to create stretch). Active stretching builds strength in your new range of motion, making flexibility gains more functional and lasting.
For example, in Downward-Facing Dog, actively press your hands into the mat and engage your arms—this is active stretching. In Pigeon Pose, you relax and let gravity create the stretch—passive stretching. Both types are valuable and complementary.
Quick Reference Checklist
- Practice yoga for flexibility at the same time daily to build a consistent habit
- Hold each pose for 6-10 slow, deep breaths rather than counting seconds
- Warm up for 3-5 minutes before beginning your flexibility practice
- Work at “comfortable discomfort”—you should feel stretching but never sharp pain
- Keep your breathing smooth and continuous throughout each pose
- Take photos on Day 1 and review monthly to track your actual progress


